How to use VIM together with VSCODE
Use Vim commands, mappings and others together with VS Code!

If you are one of those people who like Vim, but at the same time I really like VSCode, then this article is for you!
VSCodeVim is an extension for VSCode that makes it possible for you to use Vim shortcuts and commands inside VSCode!
Installation
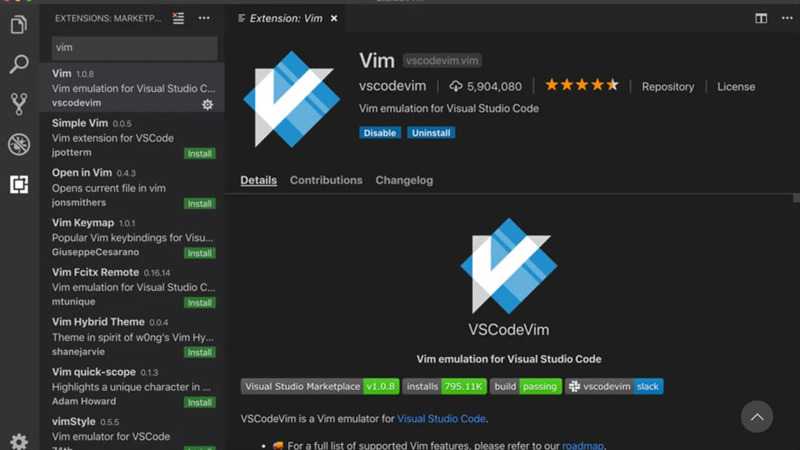
To install this extension click on the extensions tab and write in the search bar: VSCodeVim, select it and click on Install
common use
Once installed, the extension will already be automatically enabled, that is, when creating a new file you should and will be able to use the modes: Insert, Normal and Visual as it is in Vim.
Remembering that VSCode shortcuts will work simultaneously, for example:
Ctrl + Sto save.
Vim commands will also be available, examples:
:e ~/main.cpp:vsplit file.md:w:!g++ ~/main.cpp:qand among others!
Creating your mappings
To create your mappings:
- type
Ctrl + Shift + por if you are on macOS, typeCMD + Shift + p - Type:
preferences - Select the option:
Open User Settingstype:Vim - Click on
Vimand scroll down and click on the option:Edit in settings.json(Vim: Command Line Mode Key Bindings)
Erase the content and start from scratch, eg create a mapping to open the search command, but using the key combination: Ctrl + f:
{
     "vim.normalModeKeyBindings": [
     {
         "before": ["<C-f>"],
         "after": ["/"]
     }
     ]
}
Then test to see that it will be working!
Some shortcuts you create may conflict with VSCode shortcuts, but you can work around it by creating a <Leader> key, usually using the SPACE key or separating each character, for example, let’s create one more shortcut to select everything with: Ctrl + a which in Vim would be the command: ggVG:
{
     "vim.normalModeKeyBindings": [
         {
             "before": ["<C-f>"],
             "after": ["/"]
         },

         {
             "before": ["<C-a>"],
             "after": ["g", "g", "V", "G"]
         }
     ]
}
Customizing Colors
You can also customize the status bar colors, for example in the VSCodeVim repository there is the link vim-airline(https://github.com/VSCodeVim/Vim#vim-airline), copy the code and paste inside settings.json and change the colors as you wish!
#554477, #FFFFFF and #028800 for green!
{
     "vim.normalModeKeyBindings": [
         {
             "before": ["<C-f>"],
             "after": ["/"]
         },

         {
             "before": ["<C-a>"],
             "after": ["g", "g", "V", "G"]
         }
     ],


     "vim.statusBarColorControl": true,
     "vim.statusBarColors.normal": ["#554477", "#ffffff"],
     "vim.statusBarColors.insert": "#028800",
     "vim.statusBarColors.visual": "#B48EAD",
     "vim.statusBarColors.visualline": "#B48EAD",
     "vim.statusBarColors.visualblock": "#A3BE8C",
     "vim.statusBarColors.replace": "#D08770",
     "vim.statusBarColors.commandlineinprogress": "#007ACC",
     "vim.statusBarColors.searchinprogressmode": "#007ACC",
     "vim.statusBarColors.easymotionmode": "#007ACC",
     "vim.statusBarColors.easymotioninputmode": "#007ACC",
     "vim.statusBarColors.surroundinputmode": "#007ACC",
     "workbench.colorCustomizations": {
         "statusBar.background": "#028800",
         "statusBar.noFolderBackground": "#028800",
         "statusBar.debuggingBackground": "#028800",
         "statusBar.foreground": "#ffffff",
         "statusBar.debuggingForeground": "#ffffff"
     },
}
How to create iabbr
You can also create abbreviations, for example create a code for MarkDown
{
     "vim.normalModeKeyBindings": [
         {
             "before": ["<C-f>"],
             "after": ["/"]
         },

         {
             "before": ["<C-a>"],
             "after": ["g", "g", "V", "G"]
         }
     ],

     "vim.insertModeKeyBindings": [
         {
             "before": ["c", "o", "d", "e"],
             "after": ["`", "`", "`", "\n", "`", "`", "`"]
         }
     ],


     "vim.statusBarColorControl": true,
     "vim.statusBarColors.normal": ["#554477", "#ffffff"],
     "vim.statusBarColors.insert": "#028800",
     "vim.statusBarColors.visual": "#B48EAD",
     "vim.statusBarColors.visualline": "#B48EAD",
     "vim.statusBarColors.visualblock": "#A3BE8C",
     "vim.statusBarColors.replace": "#D08770",
     "vim.statusBarColors.commandlineinprogress": "#007ACC",
     "vim.statusBarColors.searchinprogressmode": "#007ACC",
     "vim.statusBarColors.easymotionmode": "#007ACC",
     "vim.statusBarColors.easymotioninputmode": "#007ACC",
     "vim.statusBarColors.surroundinputmode": "#007ACC",
     "workbench.colorCustomizations": {
         "statusBar.background": "#554477",
         "statusBar.noFolderBackground": "#554477",
         "statusBar.debuggingBackground": "#554477",
         "statusBar.foreground": "#ffffff",
         "statusBar.debuggingForeground": "#ffffff"
     },
}
Then test create a MarkDown file, example: :e ~/file.md and type code and press space.
And among many other things, for more information access the repository and the address through the links:
Watch video
The video is in Portuguese, but everything discussed here is in the video.
Comments