OpenGL Tutorial for Beginners
OpenGL is a graphics API that has several versions, each introducing new features and functionality.

OpenGL is a graphics API that has several versions, each introducing new features and functionality. To use these latest features, it is necessary to load version-specific functions at runtime using libraries:
GLAD is a library used to generate OpenGL function loaders. It helps load the functions specific to the OpenGL version you are using at runtime.
GLFW is a library that supports OpenGL window creation, input handling, and context management. It makes it easy to set up an OpenGL window and context, but it doesn’t directly handle OpenGL function loading.
GLFW, SDL2, SFML or similar can be used in conjunction with OpenGL to make it easier to manage the OpenGL window and context while you focus on the graphics operations themselves.
Vulkan (also developed by the same company, Khronos Group) and Direct3D are alternatives to OpenGL.
Installation on Windows
You must have MinGW installed, if not, use this link: How to Install GCC/G++ MinGW on Windows.
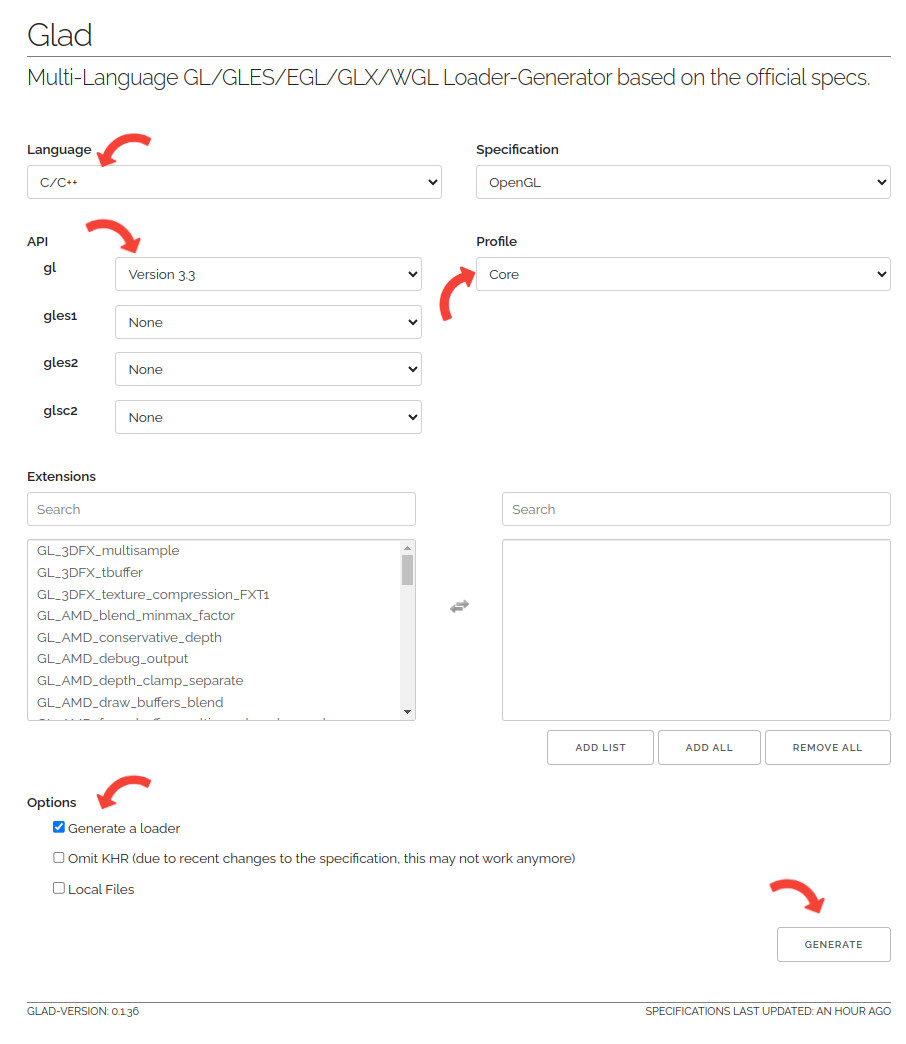
Download GLAD: https://glad.dav1d.de/
- → Language: C/C++;
- → API > gl: Version 3.3 (for compatibility with the other package that we will download, which only has version 3.3.9);
- → Profile: Core,
- Generate a loader
- → GENERATE → click on
glad.zip.
And also download GLFW: https://www.glfw.org/download.html
- → Windows pre-compiled binaries
- → 64-bit Windows binaries;
- → click to download:
glfw-3.3.9.bin.WIN64.zip
- Create a folder named: OpenGLProject
- Unzip
glad.zipand move the folders:includeandsrcto yourOpenGLProject\; - Unzip
glfw-3.3.9.bin.WIN64.zipand move theinclude/GLFWfolder toOpenGLProject\include; - Move
glfw-3.3.9.bin.WIN64\lib-mingw-64\glfw3.dllto the root of yourOpenGLProject\; - Create a folder inside the
OpenGLProjectroot namedlib; - Move the file
glfw-3.3.9.bin.WIN64\lib-mingw-64\libglfw3dll.aintoProjectOpenGL\lib; - Create a
main.cppfile insidesrc\:OpenGLProject\src; - Create a folder in the root of your
OpenGLProject\named.vscodeand inside it create a file named:task.json; - Edit this file as below:
main.cpp:
#include <iostream>
#include <glad/glad.h>
#include <GLFW/glfw3.h>

void framebuffer_size_callback(GLFWwindow* window, int width, int height){
  glViewport(0, 0, width, height);
}

int main(){
  if (!glfwInit()){
    std::cout << "Failed to initialize GLFW.\n";
    return -1;
  }

  glfwWindowHint(GLFW_SAMPLES, 4);
  glfwWindowHint(GLFW_CONTEXT_VERSION_MAJOR, 3);
  glfwWindowHint(GLFW_CONTEXT_VERSION_MINOR, 3);
  glfwWindowHint(GLFW_OPENGL_PROFILE, GLFW_OPENGL_CORE_PROFILE);

  GLFWwindow* window;
  window = glfwCreateWindow(800, 600, "C++ OpenGL on Windows", NULL, NULL);
  if (window == NULL)  {
    std::cout << "Failed to open GLFW window.\n";
    return -1;
  }
  glfwMakeContextCurrent(window);

  if (!gladLoadGLLoader((GLADloadproc)glfwGetProcAddress)){
    std::cout << "Failed to initialize GLAD.\n";
    return -1;
  }

  glViewport(0, 0, 800, 600);
  glfwSetFramebufferSizeCallback(window, framebuffer_size_callback);

  while(!glfwWindowShouldClose(window))  {
    glfwSwapBuffers(window);
    glfwPollEvents();
  }

  glfwTerminate();
  return 0;
}
And task.json:
{
  "version": "2.0.0",
  "tasks": [
    {
      "type": "cppbuild",
      "label": "C/C++: g++.exe build active file",
      "command": "C:/path/to/g++.exe",
      "args": [
        "-g",
        "-std=c++17",
        "-I${workspaceFolder}/include",
        "-L${workspaceFolder}/lib",
        "${workspaceFolder}/src/main.cpp",
        "${workspaceFolder}/src/glad.c",
        "-lglfw3dll",
        "-o",
        "${workspaceFolder}/cutable.exe"
      ],
      "options": {
        "cwd": "${workspaceFolder}"
      },
      "problemMatcher": [
        "$gcc"
      ],
      "group": {
        "kind": "build",
        "isDefault": true
      },
      "detail": "compiler: C:/C:/path/to/g++.exe"
    }
  ]
}
To compile, open the built-in VSCode terminal, enter your project: cd OpenGLProject\ and run the command below:
g++ -g -std=c++17 -I include -L lib main.cpp src/glad.c -lglfw3dllThen just run the a.exe file, if a window appears with a black background and the title: “C++ OpenGL on Windows” everything is ok!
Installation on Ubuntu
Use APT to install the following packages below:
sudo apt update
sudo apt install pkg-config libgl1-mesa-dev freeglut3-dev libglfw3 libglfw3-dev
Create a C++ file, example main.cpp and insert the content below:
#include <GLFW/glfw3.h>

int main(){

  if (!glfwInit()){
    return -1;
  }

  GLFWwindow* window = glfwCreateWindow(800, 450, "C++ OpenGL", NULL, NULL);

  if (!window)  {
    glfwTerminate();
    return -1;
  }

  glfwMakeContextCurrent(window);

  while (!glfwWindowShouldClose(window)){
    glClear(GL_COLOR_BUFFER_BIT);

    glfwSwapBuffers(window);

    glfwPollEvents();
  }

  glfwTerminate();
  return 0;
}
To compile run:
// g++ main.cpp $(pkg-config --libs --cflags glfw3) -lGL
// Or
// g++ main.cpp -lglfw -lGL -lX11 -lpthread -lXrandr -ldl
Creating a basic event
Let’s create a basic event that changes the background color of the window when clicked and when clicked again it returns the previous color and so on.
1. Create a global variable:
float color[3] = {0.0f, 0.0f, 0.0f};2. Create a function that will change the background color:
void changBG(GLFWwindow * window, int button, int action, int mod){
  if(button == GLFW_MOUSE_BUTTON_LEFT && action == GLFW_PRESS){
    if(color[0] == 0.0f){
      color[0] = 1.0f;
      color[1] = 1.0f;
    }else{
      color[0] = 0.0f;
      color[1] = 0.0f;
    }
  }
}
3. Add a function before the main loop that will call the callback function:
glfwSetMouseButtonCallback(window, changBG);4. Add the black background color at the beginning of the loop, but defined through our array that we defined as global:
glClearColor(color[0], color[1], color[2], 1.0f);Now just recompile and test!
Useful links
Watch the video
Attention, the video is in Portuguese, but it is possible to follow the procedures mentioned here regardless of your language. If you prefer, use YouTube’s automatic translation feature!
Comments